How to make Graham Apple Cups
Last night, I was pushed to recreate a Thankgiving favourite so I could serve a nice, delicious dessert for the kids to enjoy on our Family Thanksgiving dinner.
The kids actually requested for a milkshake but some of the ingredients were not available at the supermarket, so I decided to make a simpler version of Apple pie using crushed Grahams for the crust and top.
(Read: How we celebrate Thanksgiving)
I received a request for the recipe, so I thought I’d share it on the blog instead, in case there are more families out there who’d like to make the same.
By the way, it’s delicious!
Here you go:
View this post on Instagram
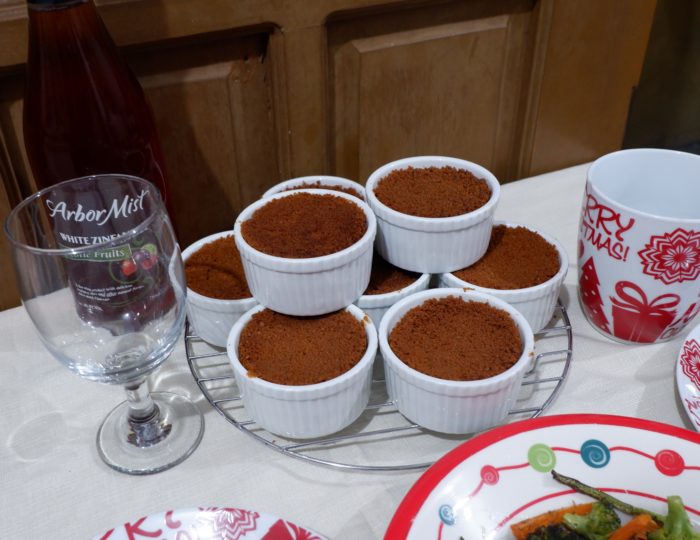
Ingredients: (Makes 10 small Ramekins)
3-4 Ripe Apples , sliced into small pieces.
2 Bars of Unsalted Butter
2 packs of Crushed Grahams
3 TBSP All Purpose Flour
1/4 C Water
1/2 C White Sugar
1/2 C Brown Sugar
How to make your crust and top:
1. Melt 1 bar of butter, pour into a mixing bowl.
2. Add your crushed grahams into your butter and mix well.
3. Using a spoon, put some graham into your ramekins and press it so it will make a firm crust. Leave some for the toppings.
4. Chill.
How to make your sauce:
1. Melt 1 stick of butter in a sauce pan.
2. Once the butter is ready, add the water, flour, and sugars, and mix well until the grains have dissolved well into the butter.
How to prepare your Apple Cups for baking:
1. Get your chilled ramekins and put sliced apples in them.
2. Pour in your sauce.
3. Put your crust mix on top and smoothen.
How to bake:
1. Pre-heat your oven to 200 degrees.
2. Put in your ramekins and bake for 10 – 15 minutes.
3. Serve!
Best served chilled!
So easy and so simple, yeah? Definitely something you can do with the kids in the kitchen and enjoy eating afterwards. I got the sauce recipe from an apple pie recipe called “Apple Pie by Grandma Ople” at allrecipes.com , but altered the dough part because I didn’t have the pastry to use. Kids love Grahams anyway, so they enjoyed the lot.
Plus, the Vanilla Ice Cream on the side was a great match!
Original recipe says you can serve hot and cold, but we liked this one best served cold.
Go ahead, try it with your kids. Let me know how yours turns out. Enjoy!

29 Comments
Pingback:
Christine Weis
OMGOODENSS–this looks so delicious. Thank you for sharing the recipe. I can’t wait to try it.
Colleen
MmmMMM! Those look so good! I love the little single-serve sizes. I can’t wait to make these.
Rowena
I’m a fan of pies specially apple pie. This one seems easy to prepare and make. I will do this soon!
Nicole San Miguel
This is new to me. Gawin ko nga to sa Christmas para maiba naman. Haha baka magustuhan ng family ko. Thanks for sharing the recipe!
May De Jesus-Palacpac
Pwede din siya in one big pan container, you probably just need to add a bit more of the graham mixture.
Anngelic
This looks really good, and I am not much of a sugertooth, so thats saying a lot!
May De Jesus-Palacpac
You’d be surprised, it’s not that sweet.
Blair villanueva
Oh wow this looks delicious! I would never say no for this treat 🙂
You did an awesome dessert!
Kevin Brotac
It looks really good! Perfect for the holidays! I love apples and well it is time to try some new recipes!
Christianforemost.com
Wow!! This is super simple and i bet delicious. Just gotta make a quick grocery run and I’ll get this done in less than an hour!!
nicolepaler
HEYYYY! Really easy vs actually making mini apple pies hahaha! Any idea how long I should pop them in an airfryer? I wanna make a small batch and I find it cumbersome to clean up a big oven, and heat up the whole kitchen with said oven hahaha
Hazel
This is so nice!! My mom always reminds me to eat apples so this is a creative and yummy way to do so! I’ll save this for recipe ideas ? i’m glad the ingredients are easily available too!
Emily Fata
This recipe looks like it would taste so good! I’ve added it to my list of recipes to try out over the holidays.
Gervin Khan
Such an easy and delicious dessert to make for my loved ones on my birthday. Thank you!
WanderWoMom
grabenaman yung pa dessert! sana magka time ako to do this for Noche Buena. looks super sarap at super easy lang to make! and something my son will eat kasi apple eh.
yudith napitupulu
Graham Apple Cups looks tasty. This is super simple to make, I really love to make this soon. Thanks for your recipe!
littlemisadvencha
wow. i love grahams but i havent tried one with apples! such an innovation. would love to see and taste this soon. <3
Veronika Sykorova
So easy and good! Loved these!
Emman Damian
I want to try Graham Apple Cups! It sounds so yummy! Also, it looks so easy to do!
knycx journeying
I t hink it’s one of the most popular desert in my family and they look so easy to make! Would love to try and make them for the holidays – Knycx Journeying
ann
Grahams with apples, wow! Wonder how delicious it will turn out, the photo looks delectable! And easy to make pa!
Cinny
It looks so nice and easy! I bet they turn out great too.
Ben
Those look awesome! I love little single-serve desserts like this. They’re always a lot of fun to serve.
Brianne
Those are too adorable! I love the cute factor of the single-serve size, and I love that I can use that crust as a base for almost any kind of sweet dessert.
Catherine
Ahh these look SO delicious! Perfect cosy winter dessert. 🙂
Lily
I love this recipe. Looks like fun desserts to make!
Karla Nina Mallannao
Wow!!! Parang ang yummy tapos ang dali lang ng ingredients and ng procedure!!! Will definitely do this pag may occassion dito sa bahay 🙂
Jelho Cabtalan Sanchez
Easy to prepare at di mahirap hanapin ang ingredients mukhang masarap. Pwede po ba sa Isang tub say mommy heheh wala kasi kaming maliliit na lalagyan cute pa naman. Tingnan